Roles, Permissions, and Approval Levels are how you give the right people the right power — and stop everyone else from accidentally cancelling Friday’s job board. This guide walks through Exoserva’s three-layer permissions model: Roles (what features you can use), Approval Levels (how big a job you can sign off), and Team Management (who has which combination).
Estimated time: 8 minutes
Before You Begin
- Owner or Tenant Administrator role (only these two can edit roles and permissions)
- A list of your current team members and their real-world responsibilities (helps you map them to the right role faster than guessing)
- (Optional) An audit log of recent permission incidents — who did the thing they shouldn’t have done — to inform what to lock down
Step 1: Open Roles & Permissions
From any page, press ⌘K (or click the gear icon top-right), then click Roles & Permissions under Organization. Direct URL: /settings/roles. The page splits into two tabs: Roles & Permissions (default) and Approval Levels (R-Levels).
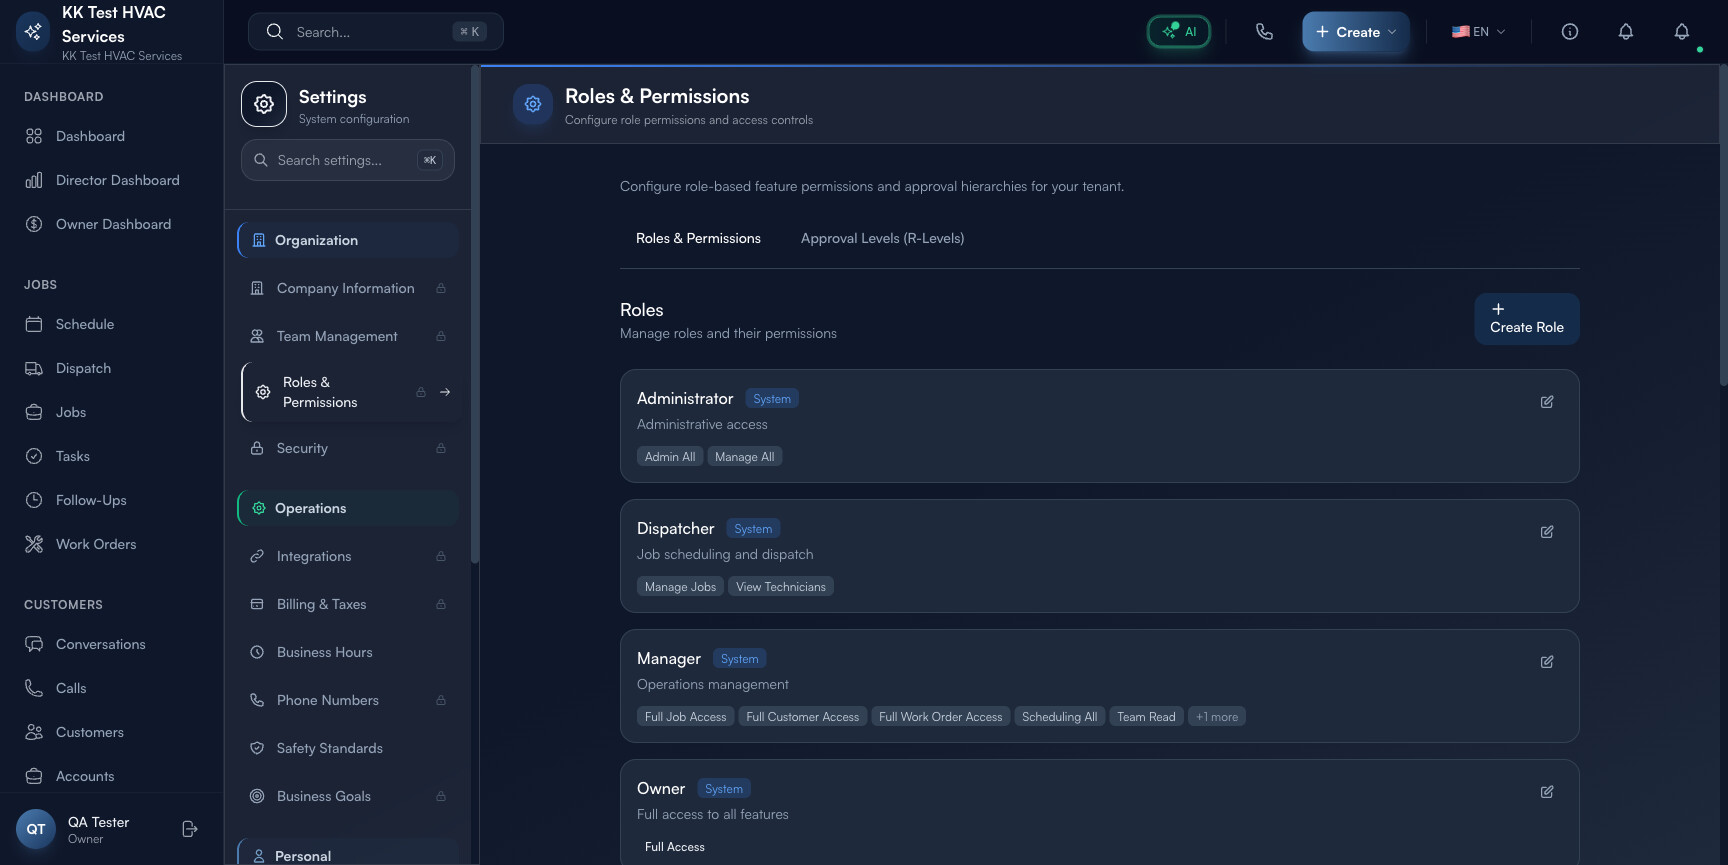
The header explains the model: “Configure role-based feature permissions and approval hierarchies for your tenant.” Below that, every existing role appears as a card.
Step 2: Read a role card
Each card has the same anatomy — and you’ll be looking at a lot of them, so it helps to read them quickly:
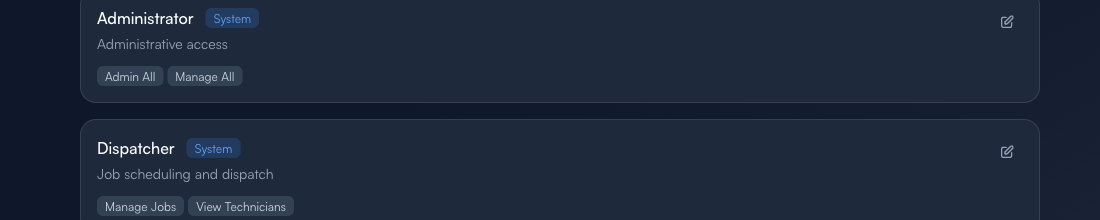
- Role name (e.g. Administrator, Dispatcher) — the title users will see when assigning
- System badge — blue System tag means a built-in role you can’t delete (only edit), no badge means a custom role
- One-line description — what this role is for, in plain language
- Permission pills — the specific features unlocked (Manage Jobs, View Technicians, Full Access, etc.)
- Edit pencil — opens the role editor on the right
Tip: Custom roles named like “QA L2 Role 1776529457 EDITED” are leftover from testing — clean them up monthly. A role list with 30+ entries becomes hard to choose from; aim for 5-8 named roles plus the system defaults.
Step 3: Use a Quick-Start Template (recommended)
Scroll down to the Quick Start Templates section. Five battle-tested templates cover ~80% of the field-service roster:
- Viewer — read-only access to jobs and customers (4 permissions). Best for: business partners, accountants, or auditors who need visibility without the ability to change anything.
- Field Technician — complete jobs, update status, add notes (6 permissions). Best for: every tech who works in the field. They can update what they’re doing but can’t see other techs’ schedules or financials.
- Office Staff — manage scheduling and customer communications (12 permissions). Best for: dispatchers, customer service, anyone running the front office.
- Operations Manager — full operational access, limited settings (8 permissions). Best for: shop managers; they can run the day but can’t change billing or rewrite roles.
- Full Administrator — complete access to all features. Best for: Owner and one designated backup. Stop here for everyone else.
Click any template to spin up a new role pre-loaded with the right permission set. Edit the name and any specific permissions, save.
Warning: Don’t grant Full Administrator to your dispatcher because they “need to fix things sometimes”. The cost of a single accidental action (cancelled invoice, deleted customer, modified billing) outweighs the convenience. Use Operations Manager + a documented escalation path instead.
Step 4: Switch to Approval Levels (R-Levels)
Click the Approval Levels (R-Levels) tab at the top. R-Levels are a separate axis from Roles — they govern how large a job, estimate, or expense someone can approve before it escalates.
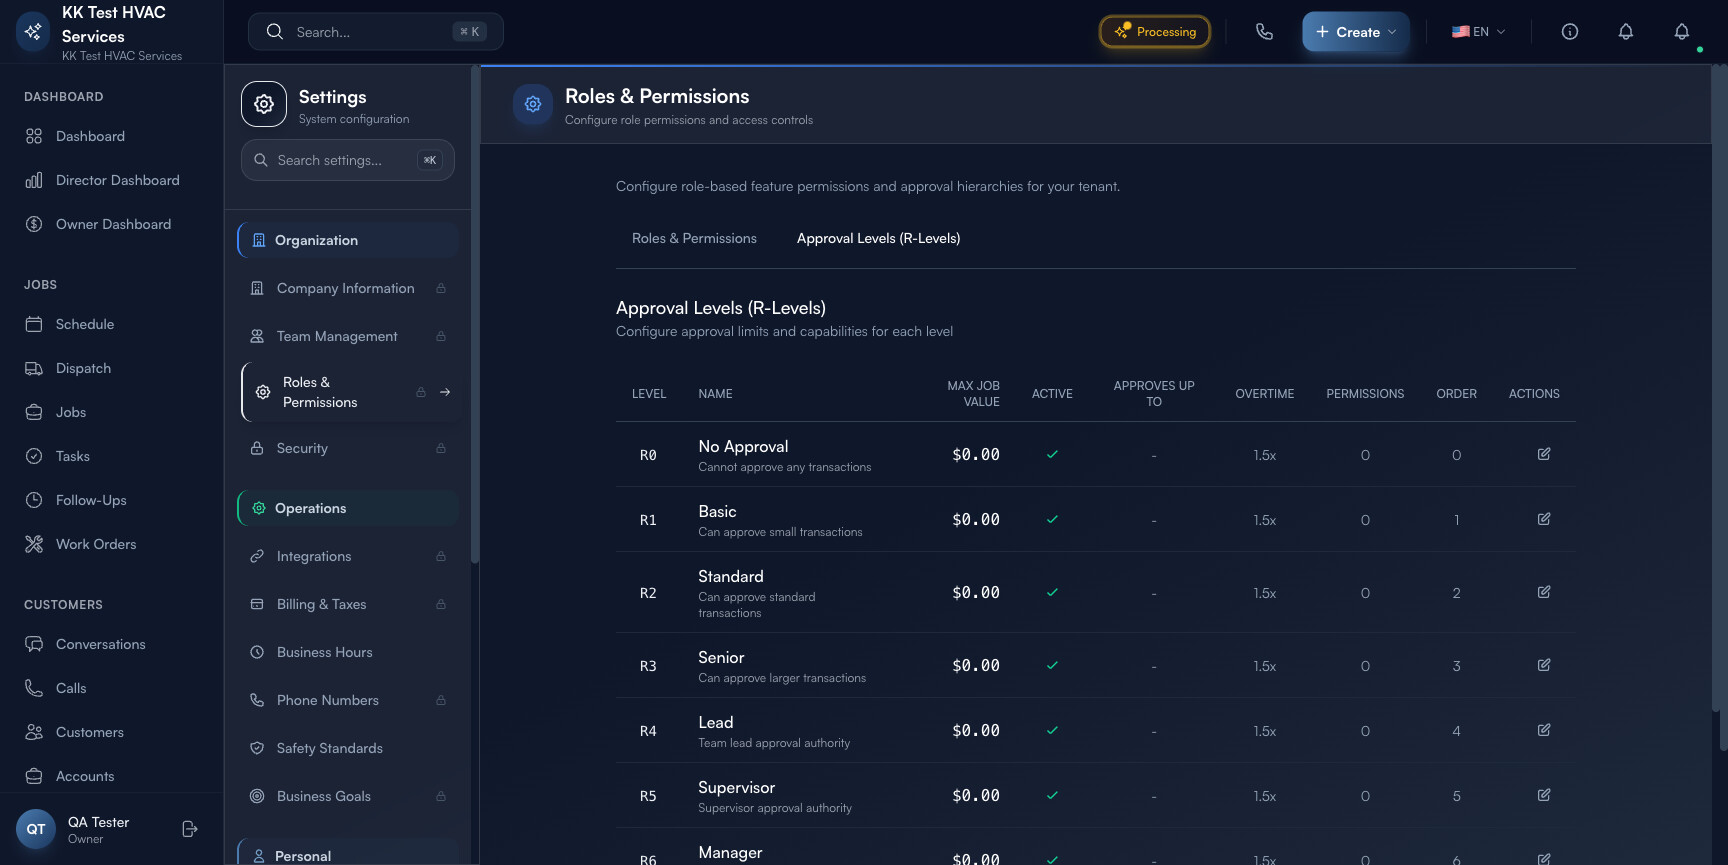
The table columns:
- Level (R0 to R5+) — the hierarchy step
- Name — No Approval / Basic / Standard / Senior / Lead / Supervisor / Manager
- Max Job Value — dollar ceiling this level can sign off
- Active — toggle on/off without deleting
- Approves Up To — which lower R-Level this one inherits authority over
- Override? — can this level override a same-or-lower-level decision?
- Permissions — links into the role table
- Order / Actions — drag-handle to reorder, edit pencil
Tip: A common pattern is to set R1 Basic = $500, R3 Senior = $5,000, R5 Manager = unlimited. Anything between those tiers escalates automatically. Keep R0 No Approval at $0 so techs never sign off without dispatcher review.
Step 5: Map roles + R-Levels to the right people
Open Team Management (/settings/team). Each row is a team member with their assigned Role and Approval Level side-by-side.
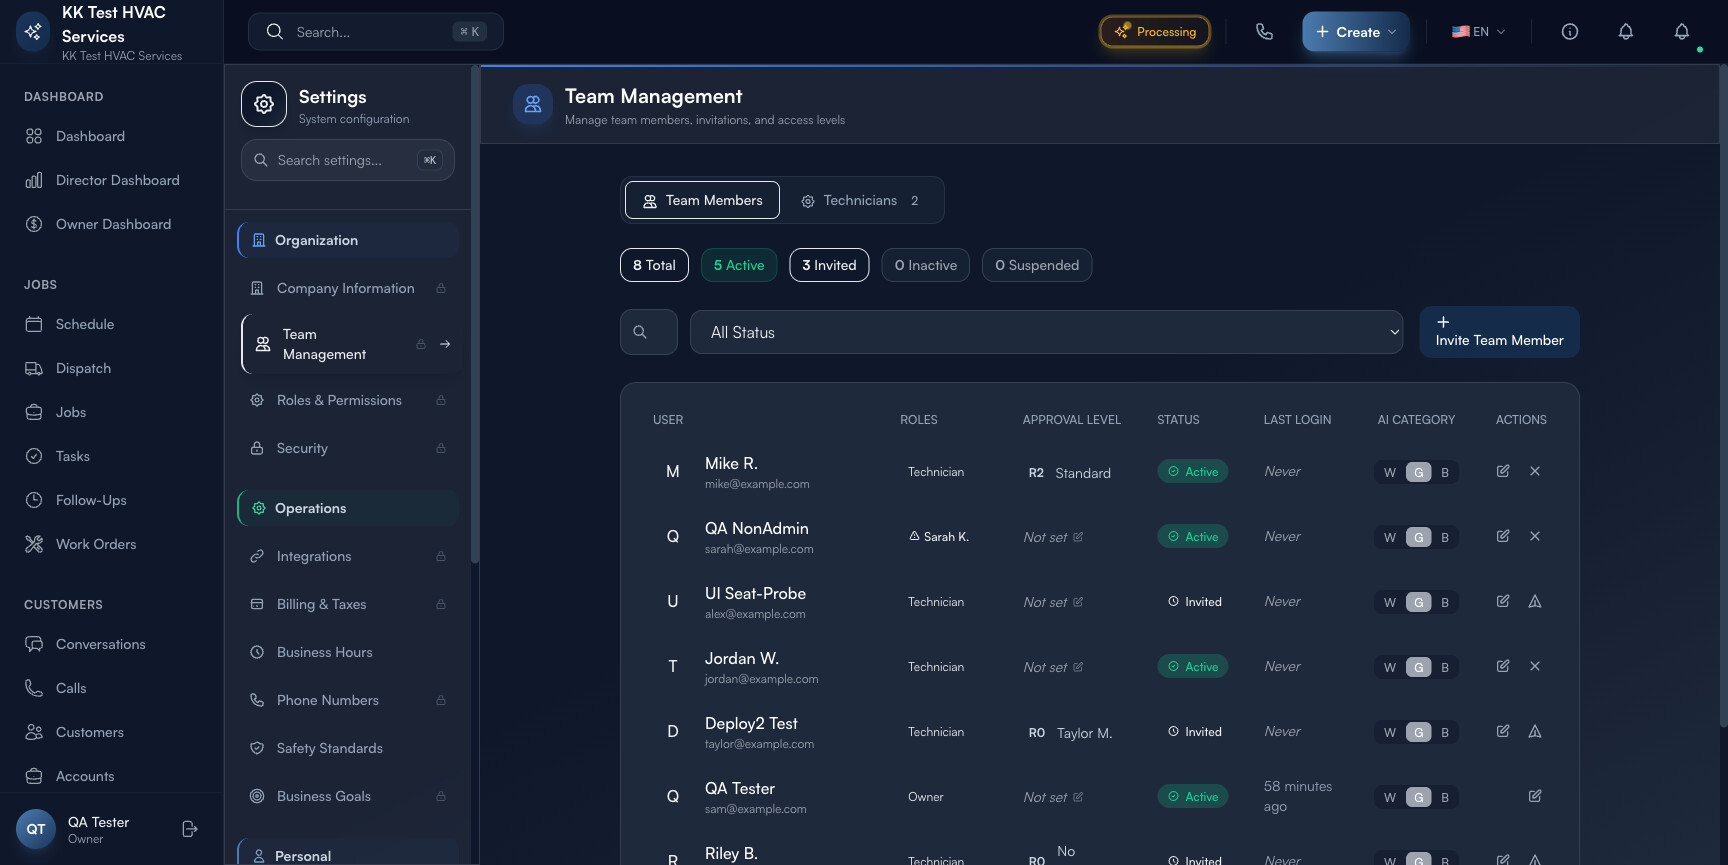
Use the status tabs (Team Members / Technicians) and the filters (All Status / Active / Invited / Inactive / Suspended) to navigate the roster:
- Active — currently logged-in seats; this is your real headcount
- Invited — sent invite, not yet accepted; nudge them weekly
- Inactive — disabled but kept for audit trail (jobs they worked on still show their name)
- Suspended — temporary lock-out; useful when an employee is being investigated or off-board
Click any row to open their detail and change role, approval level, or status. Use + Invite Team Member in the top-right to add someone new — fill in name, email, role, and (optionally) approval level. They get an email with a setup link.
Step 6: Audit who has what
The Audit Log under System in the settings sidebar (/settings/audit) shows every permission change with timestamp, who-changed-what-on-whom. Open this once a month and scan for surprises:
- A role that gained a permission no one remembers approving
- A team member with an R-Level higher than their role suggests
- Suspended accounts that were re-activated without a corresponding ticket
Warning: Permissions sprawl is a security risk. The longer you go without an audit, the more your roster looks like Swiss cheese. Make the monthly audit a calendar item and stick to it.
Real-World Example
You hire a new dispatcher named Robin. They need to see and assign jobs but shouldn’t change billing or hire/fire techs. You open Roles & Permissions, click the Office Staff Quick-Start Template, rename it “Dispatcher (Day Shift)”, click into it and remove Manage Customers (you’ve decided customer edits go through the Owner). Save. Then you open Team Management, + Invite Team Member, fill in Robin’s name and email, assign the new role, set R-Level to R1 Basic ($500) so they can approve small estimates without bothering you. Robin gets the invite email, sets a password, and is dispatching by lunch — without the ability to delete a customer record.
What’s Next?
- Adding Team Members & Assigning Roles — invite-flow companion
- Audit Log & Compliance — track every permission change
- Owner/Manager Dashboard Guide — see how role-scoped data flows to dashboards
- Configuring the AI Assistant — AI dispatch and chat respect role boundaries
Need help? Post in the Tech Support category or contact support@exoserva.com.