Service Territories let you draw your service map: zip codes, neighborhoods, or regions assigned to specific technicians. New users typically don’t realize how much downstream automation depends on territories — Auto-Assign, drive-time optimization, even tax-rate detection — until they set them up. This guide walks the page, the three views, and how to set up your first territory in 5 minutes.
Estimated time: 6 minutes
Before You Begin
- Owner or Manager role (Roles, Permissions, and Security)
- A list of zip codes or neighborhoods you want to formalize
- Two or more technicians on your team (territories with one tech are usually overhead)
What is a “Territory” — and why does it matter?
A Territory is a named geographic zone where a specific technician (or set of techs) primarily works. Examples:
- “Bay Area North” → Mike, Sarah (zip codes 94110, 94114, 94117)
- “East Bay” → Alex (zip codes 94601, 94606)
- “Peninsula” → Jordan (zip codes 94002, 94010)
Territories matter because they drive:
- Auto-Assign decisions on Dispatch (Proximity weighting respects territory boundaries)
- Drive-time efficiency — keeps techs in their zones, reduces cross-town trips
- Customer satisfaction — techs get familiar with their neighborhood quirks (parking, gate codes, tenant patterns)
- Tax-rate detection — sales tax often varies by city/county; territory-tagged jobs auto-apply the right rate
Step 1: Open the Territories page
Click Territories under Customers in the left sidebar. Direct URL: /territories. The page has a stats header, filter bar, and three view toggles.

Step 2: Read the stats header
The header shows portfolio-level metrics:
![]()
- Health % — aggregate territory coverage health (calculated from coverage vs job density)
- Needs Attention — count of territories with coverage problems (e.g., active jobs but no assigned tech)
- Total — territories defined
- Active — currently in use
- Techs — total tech-territory assignments
Step 3: Read a territory card
Each card in Cards view has the same anatomy:
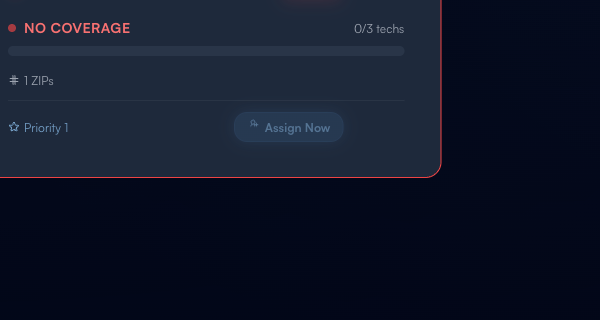
- Territory name (large) — “SF”, “Downtown”, etc.
- Critical flag (red, top) — for priority-1 territories
- Status — Active / Inactive
- Coverage indicator — 0/3 techs, Full, Limited, No Coverage
- ZIPs count — how many zip codes covered
- Priority — 1 (highest) to 5 (lowest)
- Assign Now action — button to map techs if coverage is empty
Step 4: Switch view (Cards / Table / Map)
Three views in the toolbar:
- Cards (default) — quick visual triage; coverage and priority at a glance
- Table — sortable spreadsheet for bulk edits
- Map — geographic overlay showing territory polygons against your jobs
Tip: Use Map view to find overlapping or adjacent territories — these create dispatch ambiguity. Merge or redraw them.
Step 5: Filter by coverage
Coverage chips above the list: All Coverage / No Coverage / Limited / Covered / Full Coverage.
Click No Coverage first thing in the morning — those are zones with active customers and zero assigned techs, which cause routing problems. Resolve those first.
Step 6: Add a territory
Click + Add Territory in the top-right. Fill in:
- Name (e.g. Downtown SF, East Bay South)
- Boundary — paste zip codes, draw a polygon on the map, or import a GeoJSON file
- Priority (1 = critical, 5 = low)
- Assigned techs — pick one or more from your roster
Save. The territory appears in the list and is immediately respected by Auto-Assign.
Step 7: Common new-user questions
Q: My techs already cover specific areas informally. Do I need formal territories?
A: Yes — formal territories give Auto-Assign machine-readable boundaries. Informal “Mike usually does the Mission” doesn’t help the system. 30 minutes to formalize = 30+% drive-time reduction across the team.
Q: Can a territory have multiple techs?
A: Yes — typical for high-volume zones (one tech as primary, others as backup). Auto-Assign will prefer the primary; fall back to secondaries when primary is unavailable.
Q: A customer’s zip is split between two territories. How does Exoserva pick?
A: Use the Map view to confirm the zip’s centroid lands in one territory and not the other. If you have overlapping territory polygons, the higher-priority territory wins. Avoid this — re-draw to eliminate overlap.
Q: What’s the difference between Territories and Properties?
A: Properties (guide) are individual addresses where you do work. Territories are zones grouping multiple properties. Each property auto-classifies into a territory based on its zip code.
Q: Do I need territories if I’m a one-truck shop?
A: No — single-tech operations don’t benefit from territories (every job goes to the same tech). Set them up when you hire your second tech.
Step 8: Common new-user mistakes
- Drawing too many tiny territories — “Acme Plumbing — 94110 only” + “Acme Plumbing — 94114 only” + … 12 territories for one zip-cluster region. Group instead: one “Mission District” covering 4-5 zips.
- Skipping Priority — defaults to Normal. Without explicit priority, Auto-Assign treats all territories equally. Mark your highest-revenue zones Priority 1 so techs default to them.
- One-tech territories on a multi-tech team — defeats the purpose. If only one tech ever goes to a zone, you don’t need a territory; just assign jobs to that tech directly.
Real-World Example
You run an HVAC shop with three techs and the city is splitting your time poorly: one tech crosses town twice a day for emergencies; another sits idle for an hour at lunch. You open Territories, draw three zones (North, Central, South) by zip code, assign one tech to each, and mark Central Priority 1 because it has the most paying customers. The next morning, Auto-Assign sticks each tech in their zone — drive time drops 22%, and you catch one customer in No Coverage (a zip you forgot) and add it on the spot.
What’s Next?
- Dispatcher Daily Workflow — territories drive Auto-Assign
- Using the Schedule Board — filter board by territory
- Managing Properties — properties anchor territories
- Route Optimization: Reduce Drive Time and Serve More Customers — beyond territories
Need help? Post in the Tech Support category or contact support@exoserva.com.