Voice AI is a 24/7 AI receptionist that answers your business phone, qualifies leads, books service windows, and texts confirmations — without ever sending a customer to voicemail. This guide walks through every panel of the Voice Agent Settings, what each tab does, and the order to configure them in so the first real call lands smoothly.
Estimated time: 12 minutes
Before You Begin
- Owner or Tenant Administrator role (Roles, Permissions, and Security)
- A business name and a one-line elevator pitch to feed the AI (“we’re an HVAC contractor in the Bay Area, residential and light commercial”)
- (Optional) Your existing business phone number, if you want the AI to answer it instead of provisioning a new one
- A few minutes to test — you’ll want to call the AI yourself before turning it loose on real customers
Step 1: Open Voice Agent Settings
Open Settings (⌘K → click Integrations → click the Voice AI card), or go directly to /settings/voice. The page is breadcrumbed Home → Settings → Voice Agent Settings.
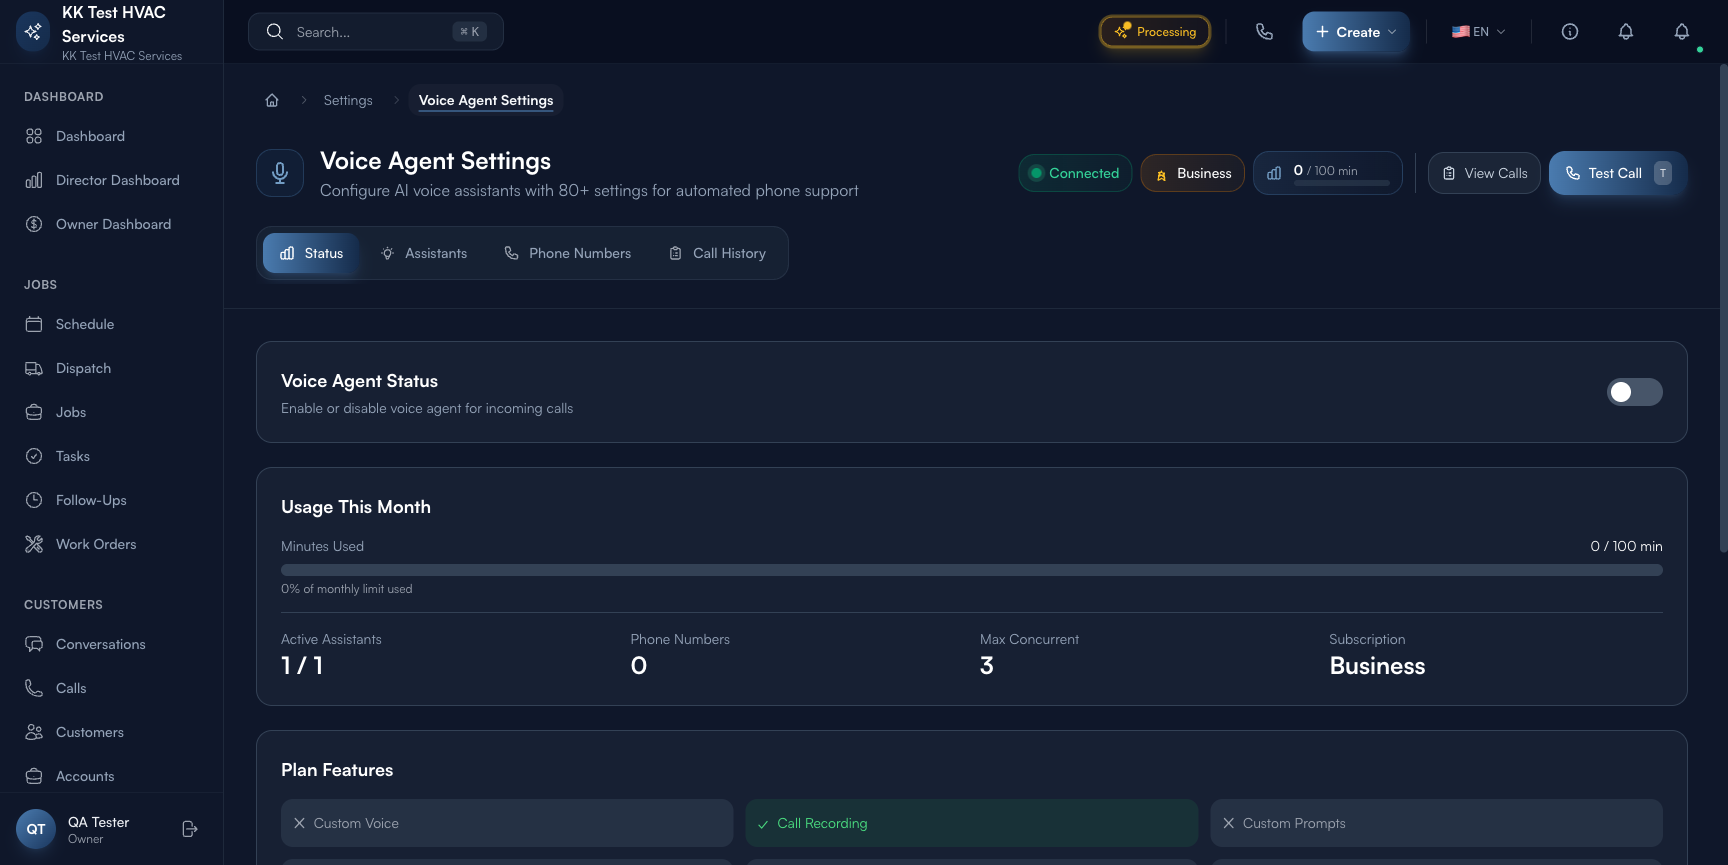
The header carries everything you need to know at a glance.
Step 2: Read the header status badges
Five elements live in the header — left to right:

- Title + tagline — “Configure AI voice assistants with 80+ settings for automated phone support”
- Connection pill (green dot, “Connected”) — confirms the underlying voice provider link is healthy. If this goes red, voice calls won’t work — restart at this page before troubleshooting elsewhere.
- Plan pill — your current subscription level (e.g., Business). The plan controls the feature gates listed lower on the page.
- Usage gauge — minutes used this month / limit (e.g., 0 / 100 min). Real-time, not lagged.
- View Calls — jumps to the Call History view (also reachable via the Call History tab).
- Test Call (T) — initiates a synthetic call so you can hear what your AI sounds like before it picks up a real customer. Use this every time you change a prompt, a voice, or a phone number.
Step 3: Walk through the four tabs
The page splits into four navigation tabs immediately under the header:
- Status — current usage, plan features, notification preferences (this is where you land by default)
- Assistants — your configured AI personalities (one per line of business is typical: “Reception” for inbound, “After-Hours” for emergency-only routing)
- Phone Numbers — the actual phone numbers customers dial; each maps to one assistant
- Call History — every call with audio, transcript, classification, and outcome
Configure them in this order — Assistants first (the persona), Phone Numbers second (the front door), Status last (turn it on once everything else is right), Call History continuously (every day’s review).
Step 4: Status tab — read the dashboard
The Status tab below the tabs has four panels.
Voice Agent Status — the master toggle. Off until you’re ready for live calls.
Usage This Month — a progress bar (e.g. 0 / 100 min, 0% of monthly limit used) and three side counters:
- Active Assistants (e.g. 1 / 1)
- Phone Numbers (e.g. 0)
- Max Concurrent (e.g. 3) — how many simultaneous calls your plan handles
Plan Features — a six-bullet matrix telling you which capabilities are enabled by your plan: custom Voice ✓/✗, call Recording ✓/✗, custom Prompts ✓/✗, advanced Analytics ✓/✗, multiple Assistants ✓/✗, property Management ✓/✗. The “Upgrade your plan to unlock more features” link sits below this matrix.
Notifications — the contact info Exoserva uses to reach you when something call-related happens:
- Notification Email
- Notification Phone
- Three event toggles: missed calls, new bookings, emergencies (turn all three on; they’re how you discover the AI was busy without watching the dashboard)
Tip: Configure notifications BEFORE flipping Voice Agent Status on. The first day after activation generates more notifications than you expect — you want them landing where you already check, not bouncing to an unmonitored inbox.
Step 5: Assistants tab — set up your AI personality
Click the Assistants tab. This is where you configure who picks up the phone.

The header shows “X / Y assistants configured” (your plan’s limit). Click + New Assistant in the top-right to add one, or click Configure on an existing one to edit. Each assistant card carries:
- Assistant name (e.g. “Reception Bot”) and a short label
- Active / Inactive badge
- Voice Provider / Language / Max Duration / Tools / Sync Status — the technical specs row
Inside the Configure flow you’ll set:
- Persona — name, voice (American English / British English / Spanish, etc., depending on your plan), tone
- Knowledge — your business hours, services, pricing range, service area
- Routing rules — when to escalate to a human, when to book directly, when to take a message
- Compliance — recording disclosure, opt-out language, after-hours behavior
Tip: Start with one assistant. Most contractors don’t need separate inbound and after-hours bots. Adding a second assistant doubles the surface area for the AI to drift on; one well-tuned assistant beats two half-tuned ones every time.
Step 6: Phone Numbers tab — wire up the front door
Click the Phone Numbers tab. This is where you decide which phone the AI answers.
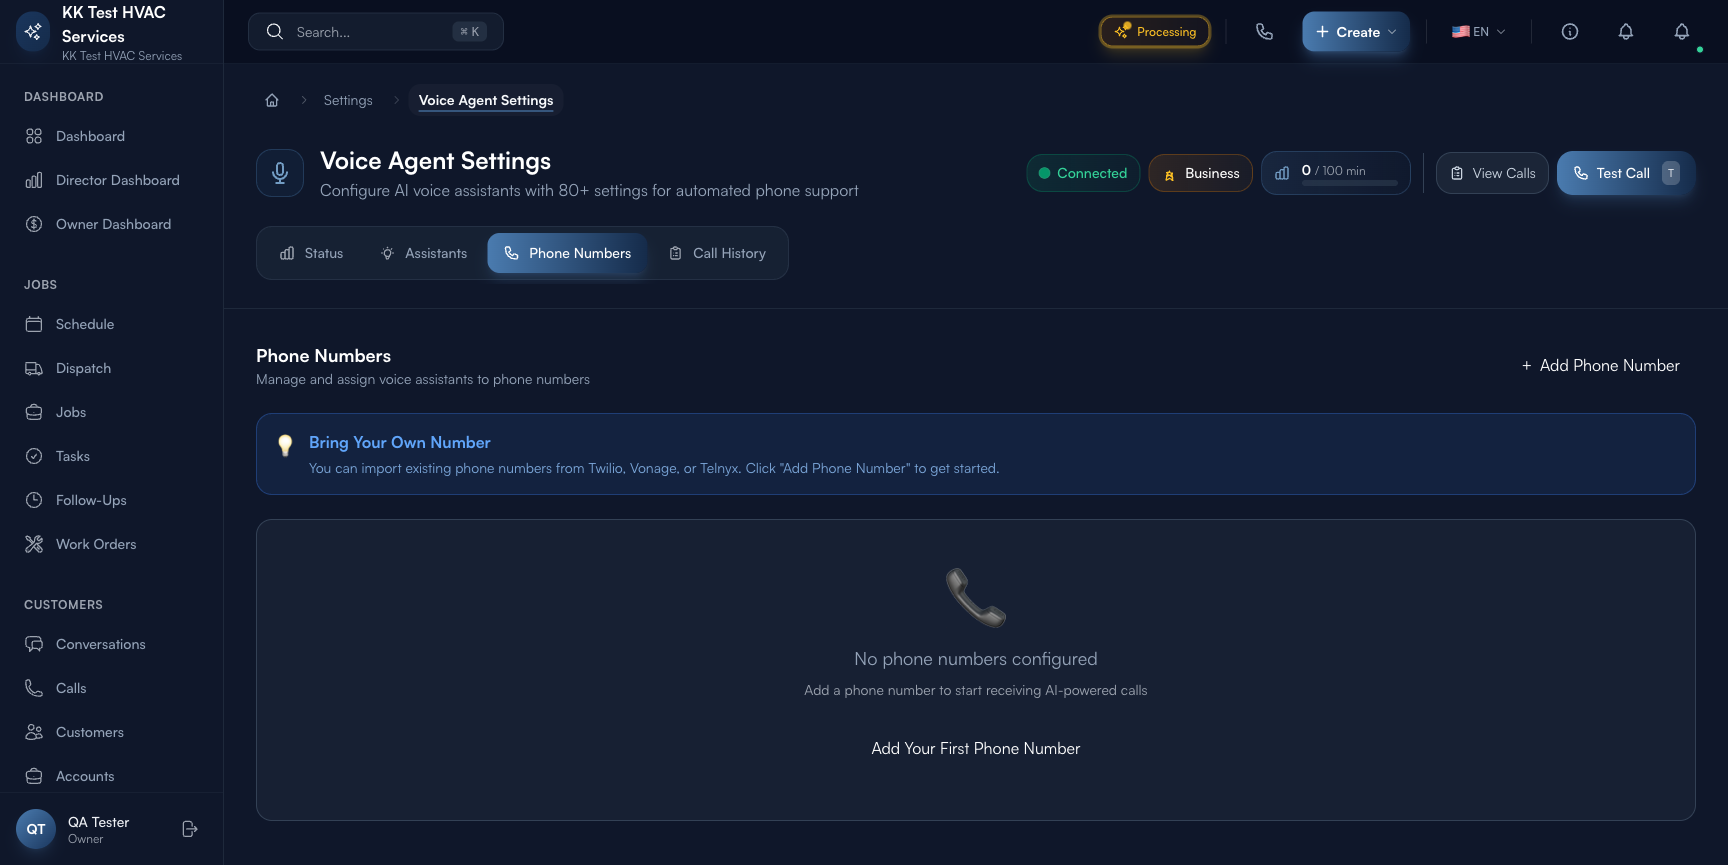
You have two paths:
- Add a new local number — Exoserva provisions a phone number (typically with an area code matching your service zone) that the AI answers from day one. Best for: forwarding your existing line to during off-hours or for marketing campaigns.
- Port your existing number — your customers keep dialing the number they already know; the AI takes over the answering. Takes 5-10 business days to complete. Best for: fully replacing a call-answering service.
Each number row maps to one assistant. Multi-number accounts can route different numbers to different assistants (e.g. main line → Reception, after-hours line → Emergency Triage).
Warning: Don’t port your only business line until you’ve tested the AI thoroughly with Test Call and at least one new number for a week. Porting is reversible but takes days. New-number provisioning takes seconds and gives you a safety valve.
Step 7: Make a Test Call
Click Test Call in the header (or press T). The AI initiates a call to your registered phone — pick up and have a real conversation:
- Ask for service: “I need someone to come look at my furnace”
- Push back: “Can you do it cheaper?” / “Can you come tonight?”
- Be unclear: “Uhhh, I dunno, the thing’s making a noise”
Listen for: tone (does it sound like your business, or generic chatbot?), accuracy (does it know your service area / hours?), recovery (does it gracefully escalate when it doesn’t know?). Adjust prompts in Assistants → Configure → Persona until the test calls feel natural.
Step 8: Flip Voice Agent Status on
Once Test Calls feel right, return to the Status tab and toggle Voice Agent Status on. The next inbound call to a configured number is answered by the AI.
For the first 24 hours, watch the Call History tab and your notification email/phone. Every call gets a recording (if your plan allows), transcript, and outcome (booked / message taken / escalated). Use these to find prompts that need tuning before the AI repeats the same mistake on a hundred calls.
Step 9: Watch your usage
Voice AI consumes minutes from your plan’s monthly pool (the gauge in the header). When you exceed the pool, you fall onto per-minute overage pricing — set in your billing docs. To stay ahead:
- Check the gauge daily during the first week, weekly thereafter
- Set up a Usage Alert in Notifications at 80% of the limit so you know before overage hits
- Review Call History for unusually long calls — sometimes the AI doesn’t recognize a hangup signal and drives up minutes; tuning fixes this
Warning: AI minutes are real money once you’re past the included pool. If you run a marketing campaign that 5x’s your inbound call volume, your monthly bill 5x’s too. Coordinate marketing pushes with the billing context — see your tier’s overage rates.
Real-World Example
You’re a one-truck plumber with a part-time spouse who handles your phone during the day. They’ve been complaining about evening calls eating dinner. You open Voice Agent Settings, configure one assistant called “Bay Plumbing After-Hours” with hours 6 PM-7 AM, port a new number Exoserva provisions for you, set night-call forwarding from your main number to it, and toggle Status on. By the end of week one: 14 evening calls handled, 9 booked for the next morning, 2 emergencies escalated to your cell, 3 messages taken. Your spouse never picks up an after-hours call again, and you don’t miss a single revenue opportunity.
What’s Next?
- Configuring the AI Assistant — fine-tune the prompts and behaviors
- Voice Analytics — Understanding Your Calls — measure how the AI is performing
- Conversations and Customer Chat — text follow-ups land here, threaded against each call
- AI Settings Hub — meta-overview of every AI surface
Need help? Post in the Tech Support category or contact support@exoserva.com.