Conversations is your unified inbox for every customer message — texts, emails, voicemails-as-text — threaded against the customer record so anyone on your team can pick up where the last person left off. New users typically don’t realize how much sits here (Voice AI replies, Thumbtack leads, customer text-backs all land in this one place); this guide is the new-user walkthrough that maps every panel and the workflow patterns that keep your customer-response time under 5 minutes.
Estimated time: 7 minutes
Before You Begin
- Owner, Manager, or Dispatcher role (Roles, Permissions, and Security)
- (Recommended) Voice AI configured (Setting Up Voice AI) — inbound texts and call-summaries land here
- (Optional) AI Assistant turned on for AI-drafted replies (Configuring the AI Assistant)
What is “Conversations” — and what’s a “thread”?
A thread is the running history of every message between you and one customer, on every channel (SMS, email, AI-receptionist call summary). Each customer has one thread — even if they sometimes text and sometimes email, all messages collapse into the same conversation.
This is different from email or SMS apps where each medium has its own inbox. Exoserva treats the customer relationship as the unit, not the channel. When you reply to an SMS thread, the customer can reply by email if they prefer — both land in the same thread.
Step 1: Open Conversations
Click Conversations in the left sidebar (also reachable as Chats from the + Create menu, shortcut ⌘M). Direct URL: /chat. The page splits into three vertical panes.
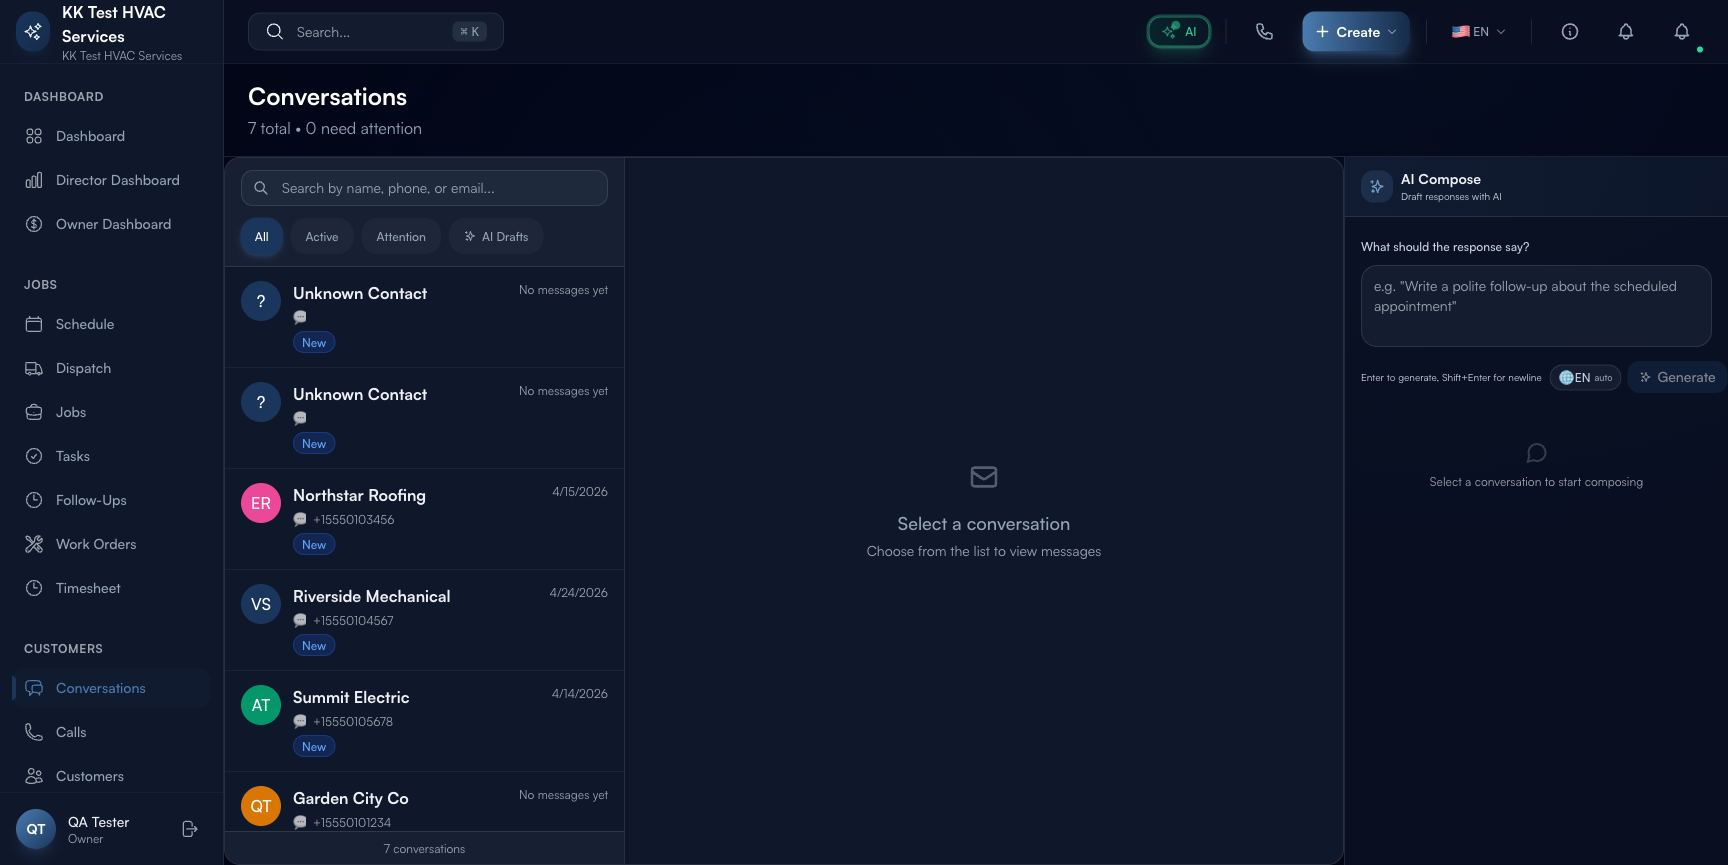
The three panes:
- Thread list (left, ~30% wide) — every conversation, sorted by latest activity
- Message pane (center, ~40%) — the selected thread’s full message history
- AI Compose panel (right, ~30%) — AI-drafted reply assistant
When no thread is selected, the message pane shows “Select a conversation” and AI Compose is greyed out.
Step 2: Read the thread list
The list shows every conversation with these elements per row:
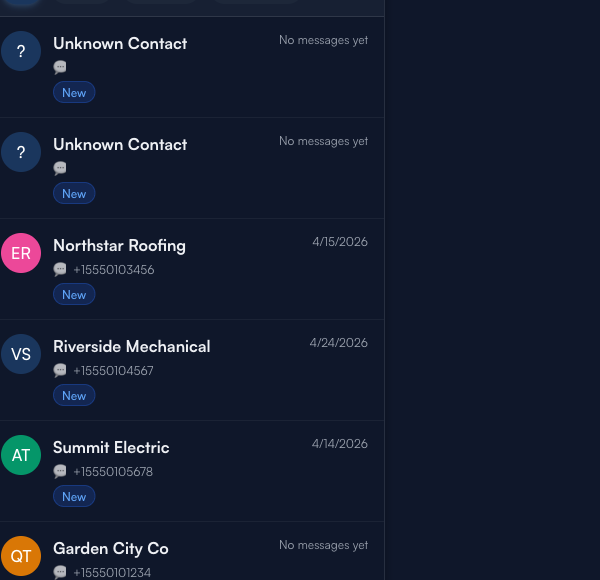
- Avatar — initials or photo
- Customer name (or “Unknown Contact” for unrecognized phone numbers)
 channel icon + status pill (New / In progress / Resolved)
- Phone or email (small, under name)
- Last activity date + summary of last message
The header above the list:
- Total count + needs attention count (e.g. “7 total · 0 need attention”)
- Search by name, phone, or email — full-text
- Filter tabs below: All / Active / Attention / AI Drafts
Step 3: Use the four filter tabs
Each tab is a different lens on the same data:
- All — every thread, newest first; default view
- Active — open threads with messages in the last 30 days
- Attention — threads with an unanswered inbound message; this is your queue
- AI Drafts — threads where AI has written a reply but you haven’t reviewed/sent yet
Tip: Start every shift on Attention. That’s the queue of customers actively waiting for you. Empty it before doing anything else — every minute a customer waits is a minute closer to them calling a competitor.
Step 4: Click a thread to read
Click any thread row to load its full history in the message pane:
- Timestamps on each message
- Direction — inbound (left, blue) vs outbound (right, your business color)
- Channel — SMS / email / call-summary visible per message
- Auto-tags — Exoserva classifies messages (quote request, scheduling change, complaint) and shows colored tags
Scroll to read older messages. The thread loads from newest at the bottom (matches messaging-app convention).
Step 5: Use AI Compose to draft a reply
When a thread is selected, the AI Compose panel on the right activates:
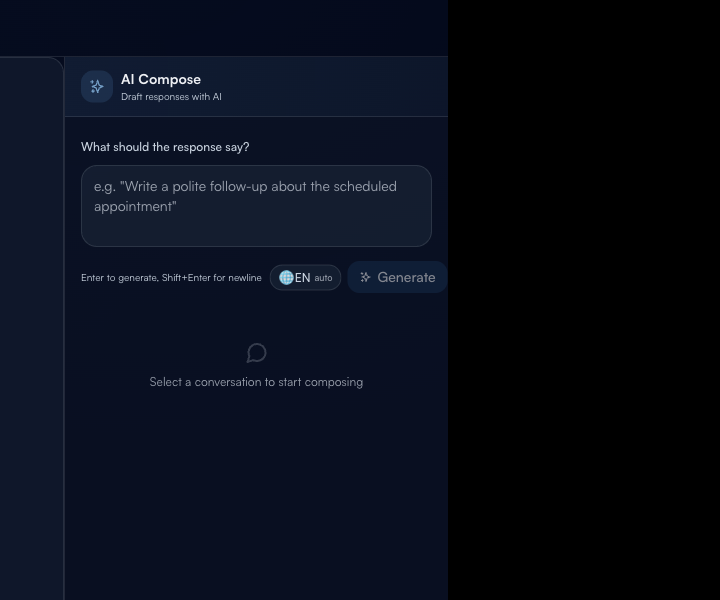
How it works:
- Type a one-line goal in the What should the response say? box. Example prompts:
- “propose 3 PM Tuesday”
- “apologize for the late tech and offer 10% off”
- “ask if they’re available tomorrow morning”
- Press Enter (or click Generate) — the AI drafts a complete reply in your business voice (configured in AI Settings) within 1-2 seconds
- Review the draft, edit if needed, click Send
The draft uses the customer’s name, references the thread context, and matches the tone you’ve configured. You’re approving, not writing from scratch.
Tip: The
EN auto language selector translates outbound replies. If your customer wrote in Spanish or Vietnamese, change to that language and the AI replies in the customer’s language. Drives 2-3x faster resolution for non-English speakers.
Step 6: Convert a thread into action
Above the message pane, the toolbar has actions:
- Schedule a job — pre-fills the Job wizard with the customer + address + AI-summarized scope from the conversation
- Add a follow-up — creates a Follow-Up task for delayed touches
- Mark as read — clears the Attention badge without replying (use sparingly)
- Block — stops accepting messages from that number (for spammers/wrong numbers)
The Schedule a job flow is the highest-leverage action — it turns “customer texted about HVAC issue” into “job booked” in 30 seconds.
Step 7: Search, filter, and pin
The search bar at the top matches name, phone number, email, or message text (full-text search across the message body). Useful for finding “who was the customer that mentioned the leak last week?” — search “leak”, get every thread that mentioned it.
Pin VIP customers using the ★ icon in the thread row. Pinned threads stay at the top of the list regardless of recency.
Step 8: Common new-user questions
Q: An “Unknown Contact” thread keeps showing up — what do I do with it?
A: Click into it. Read the message — usually it’s a wrong number, a spam SMS, or a customer who hasn’t been entered yet. Three actions: Block (spam), Add Customer (legitimate; turns it into a real customer record), or Mark as read (drop without responding).
Q: I sent a reply but the customer says they didn’t get it. Why?
A: Possible causes: (1) Customer’s phone blocks SMS short codes — Exoserva uses your local-number SMS by default, which usually delivers, but some carriers filter aggressively. (2) The reply went to email but customer only checks SMS. Check the message detail (timestamp, direction, channel) — if it’s grey/red, delivery failed; resend via different channel.
Q: Can the customer see the AI is drafting their replies?
A: No. The customer sees what you (or your team) sends. AI Compose is a backend authoring tool. It’s still your business’s voice, just drafted-by-AI, sent-by-you.
Q: Multiple team members reply to the same thread — does it confuse?
A: The thread shows who sent each outbound message (avatar/name). Team members can read the full history before replying, so handoffs are smooth. The customer just sees “your business” — they don’t see the team detail.
Q: How does this relate to the Calls page?
A: Calls (Voice Analytics guide) shows every phone call with audio + transcript. Conversations shows the threaded text history per customer. When the AI receptionist takes a call, the call appears on Calls and a summary lands as a message in the customer’s Conversations thread. Two views, one underlying customer record.
Step 9: Common new-user mistakes
- Working from the All tab instead of Attention — wastes time scrolling through resolved threads. Filter to Attention first.
- Sending an AI draft without reading it — AI is good but not perfect. 30 seconds of review prevents an off-tone send that might irritate the customer.
- Not marking threads complete — leaves Attention growing. After replying, if the conversation feels resolved, hit Mark as read to clear the badge. The customer can still write back; the thread re-appears in Attention then.
- Treating Conversations as one-way — it’s bidirectional. Customers reply, follow up, ask new questions. Treat the thread as a relationship history, not a ticket queue.
Real-World Example
A customer texts at 6:47 AM: “AC stopped overnight, two kids at home, can someone come today?” The AI receptionist auto-classifies it as Emergency, the thread shows up in Attention at 6:48 AM with a red urgency tag. You click in, read the full message, type a one-line goal in AI Compose: “confirm we can come today, give a 30-minute window if possible”. The AI drafts: “Hi {customer name}, sorry to hear about the AC — we can absolutely get someone out today. Mike can be at your address between 10:30 and 11 AM. Confirm and we’ll text again when he’s on the way.” You hit Send, then click Schedule a job — pre-filled with the customer, address, and “Emergency: AC stopped overnight, 2 kids at home” as the title. Total time from text-received to dispatched job: 90 seconds. Customer’s reply “thank you so much!” shows up in the thread before 7 AM.
What’s Next?
- Setting Up Voice AI — inbound calls become threads here too
- Configuring the AI Assistant — tune what AI Compose sounds like
- Follow-Ups and Task Management — every long-tail thread becomes a follow-up
- Customer Communication Automation for Home Services — the strategic framework
Need help? Post in the Tech Support category or contact support@exoserva.com.