Follow-Ups are everything that needs to happen after the visit ends — the estimate to send, the part to order, the warranty check at six months. New users typically don’t realize how much revenue lives in this queue: contractors who systematically work follow-ups generate ~25% more annual revenue than those who don’t, with zero new marketing spend. This guide walks the page, the four lanes, and the daily habit that turns Follow-Ups from a graveyard into a growth engine.
Estimated time: 5 minutes
Before You Begin
- Owner, Manager, or Dispatcher role (Roles, Permissions, and Security)
- A few completed jobs (Creating and Managing Jobs) — every job auto-suggests a follow-up
What is a “Follow-Up” — and how is it different from a Task?
- Follow-Up = customer-facing delayed touch (send the warranty check, ask for the review, schedule the maintenance reminder)
- Task = internal work item (order parts, file paperwork, call the supplier)
Two different lists. Same idea (don’t forget to do this) but different audiences. This guide is about Follow-Ups; for internal todos, use the Tasks sidebar entry.
Step 1: Open the Follow-Up Queue
Click Follow-Ups in the left sidebar. Direct URL: /follow-ups. The page header shows four counters and a sort selector.
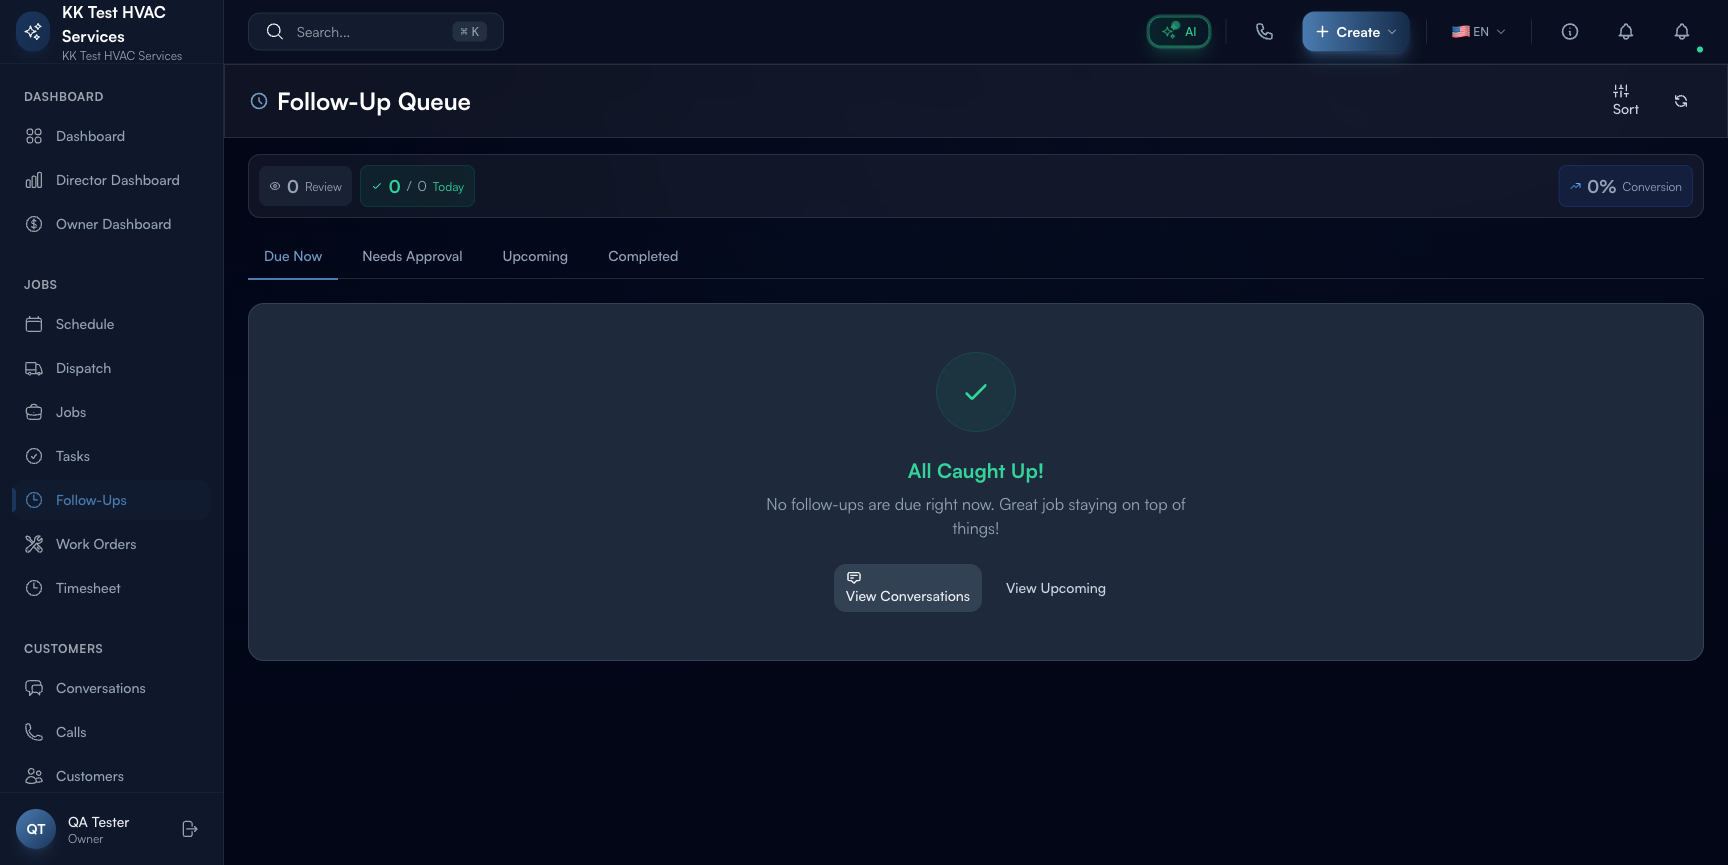
Step 2: Read the four header counters
The header strip at the top:

- Sort — current sort order (by date / by priority / by customer)
- Review — items awaiting your approval (auto-generated follow-ups need a human sign-off)
- Today — items due today; this is your immediate queue
- Conversion % — how many follow-ups led to a new booked job, paid invoice, or positive review (the metric that matters)
Tip: The Conversion percentage is the most underrated KPI in field service. Aim for 40%+ over a rolling 30-day window. Below 30% means your timing or message isn’t landing; the AI auto-drafts could be off-tone or the cadence too aggressive.
Step 3: Read the four tab lanes
The queue splits into four tabs with live counts:

- Due Now — overdue or due today; clear these first
- Needs Approval — auto-generated follow-ups awaiting your sign-off (e.g. “Send 6-month check-in to last quarter’s HVAC installs”)
- Upcoming — future follow-ups with their scheduled date
- Completed — what you’ve closed this week, with conversion outcome
A green “All Caught Up!” empty state means there’s nothing pending — that’s the goal. Don’t keep this page busy on purpose; an empty queue is a healthy queue.
Step 4: Approve auto-generated follow-ups
Open the Needs Approval tab. Each card shows:
- Trigger — “Job #JOB-20260501-0042 marked complete 5 days ago — propose 30-day warranty check”
- Suggested customer — who it’s for
- Suggested message — AI-drafted text in your business voice
- Action buttons — Approve / Edit / Skip
Click Approve to schedule, Edit to tweak the timing or copy, Skip if not applicable.
Tip: Don’t rubber-stamp every Needs Approval item. The AI is good but not perfect — sometimes proposes a follow-up to a recently-cancelled customer, or duplicates a touch from earlier in the month. Skim each before approving.
Step 5: Complete a follow-up
In Due Now, click any item to open the detail pane. You’ll see:
- Customer + linked job (full context)
- Message draft — pre-written; edit before sending
- Three action buttons:
- Send — fires off the email/SMS using saved templates
- Schedule a job — turns the follow-up into a new job in one click (highest-leverage path)
- Mark done (no action needed) — closes the loop with a note
Pick one. The follow-up moves to Completed with the chosen outcome captured for your Conversion %.
Step 6: Track Conversion %
Open the Completed tab. Each item shows the outcome:
 Job booked — you upsold a related visit
 Invoice paid — you collected a previously-overdue amount
 Review received — they wrote a public review
 Mark done — non-conversion (informational only)
The header Conversion % = (booked + paid + review) ÷ total completed. Aim for 40%+. If you’re below, look at which follow-up types underperform — usually the script needs work or the timing is off.
Step 7: Common new-user questions
Q: My queue keeps filling up. How do I stop it?
A: You don’t — that’s the system working. Every completed job generates a follow-up. Process them daily; don’t try to silence the source. Spending 10 min/day clearing follow-ups generates more revenue than 10 min/day on cold outreach.
Q: I approved a follow-up but the customer hasn’t replied. What happens?
A: Nothing automatic — Exoserva sent your message, the customer hasn’t yet engaged. After 7 days of no reply, the follow-up shows in Due Now again as a re-touch reminder. You can re-send, change tactics, or Mark done to move on.
Q: Can I create a custom follow-up not tied to a job?
A: Yes — click + New Follow-Up in the top-right. Pick a customer, set a date, write the message. Used for “reach out to the property manager next quarter” or other long-horizon touches not auto-generated.
Q: Difference between Follow-Up and a Workflow?
A: Follow-Ups are items in a queue you process manually (with AI assistance). Workflows (Workflow Builder guide) are fully-automated pipelines that fire without human review. Follow-Ups are higher-touch / higher-conversion; Workflows are higher-volume / lower-touch. Use both.
Q: How does this connect to Conversations?
A: Replies to follow-ups land in Conversations under the customer’s thread. Approve a follow-up → message sends → customer replies → you see it in Conversations Attention tab. Two views, one customer relationship.
Step 8: Common new-user mistakes
- Letting Needs Approval stack up to 50+ items — backlogged approvals lose freshness. Process at least daily; a 30-day-old approval is no longer relevant by the time you click it.
- Skipping the Real-World context in the customer note — generic “checking in!” messages convert at 5%; personalized “checking in on the water heater install we did 30 days ago” converts at 25%+. The AI drafts these for you; don’t dilute them by editing back to generic.
- Treating Mark done as a shortcut — it’s the “no action needed” outcome. If you Mark done as a way to clear the queue without engaging, you’re skipping revenue.
- Not measuring Conversion % — without the metric, you can’t tell if your follow-up game is working. Glance at it weekly; investigate any drop below 30%.
Real-World Example
A customer’s water heater install completes Tuesday. Friday, a follow-up auto-appears in Needs Approval: “Send post-install satisfaction text to the customer.” You approve. They reply “Looks great, but the pressure-relief valve is dripping.” You click Schedule a job directly from the conversation; the new visit is on tomorrow’s board with the original install context attached. Total time from auto-trigger to scheduled fix: under two minutes. Customer gets a fast resolution; you get a billable second visit.
What’s Next?
- Conversations and Customer Chat — replies land here
- Configuring Notifications — control the noise threshold
- Workflow Builder – Automate Your Operations — build custom auto-follow-up rules
- Reports and Analytics — long-term conversion trends
Need help? Post in the Tech Support category or contact support@exoserva.com.