Work Orders are the longer-running cousin of Jobs. New users typically don’t need them on day one — but the moment you sign your first commercial maintenance contract, manage a multi-property portfolio, or handle a multi-week install, Work Orders become essential. This guide explains the difference, walks the Kanban board with screenshots, and shows when (and when not) to use Work Orders vs Jobs.
Estimated time: 7 minutes
Before You Begin
- Owner, Manager, or Dispatcher role (Roles, Permissions, and Security)
- (Optional) An open work order in the system — fresh boards are fine too
What is a “Work Order” — and how is it different from a Job?
The simplest way to think about it:
- Job = one visit. One tech, one trip, one customer-facing event. Resolves in hours.
- Work Order = one project. One scope of work that may take days, weeks, or months and may include multiple jobs underneath. Resolves over a longer horizon.
Examples:
- Drain auger at customer’s home → Job
- Annual maintenance contract — 4 visits over 12 months → Work Order (with 4 Jobs under it)
- Replace HVAC system → Work Order (Estimate visit + Install visit + Follow-up inspection)
- Property manager portfolio: 12 buildings, quarterly maintenance → 12 Work Orders (one per building), each with quarterly Jobs
For most residential one-truck contractors, you’ll work primarily in Jobs (Creating and Managing Jobs). Work Orders matter for B2B contracts, multi-week projects, and multi-property accounts.
Step 1: Open the Work Orders board
Click Work Orders in the left sidebar. Direct URL: /work-orders. The page is a Kanban board with four columns.
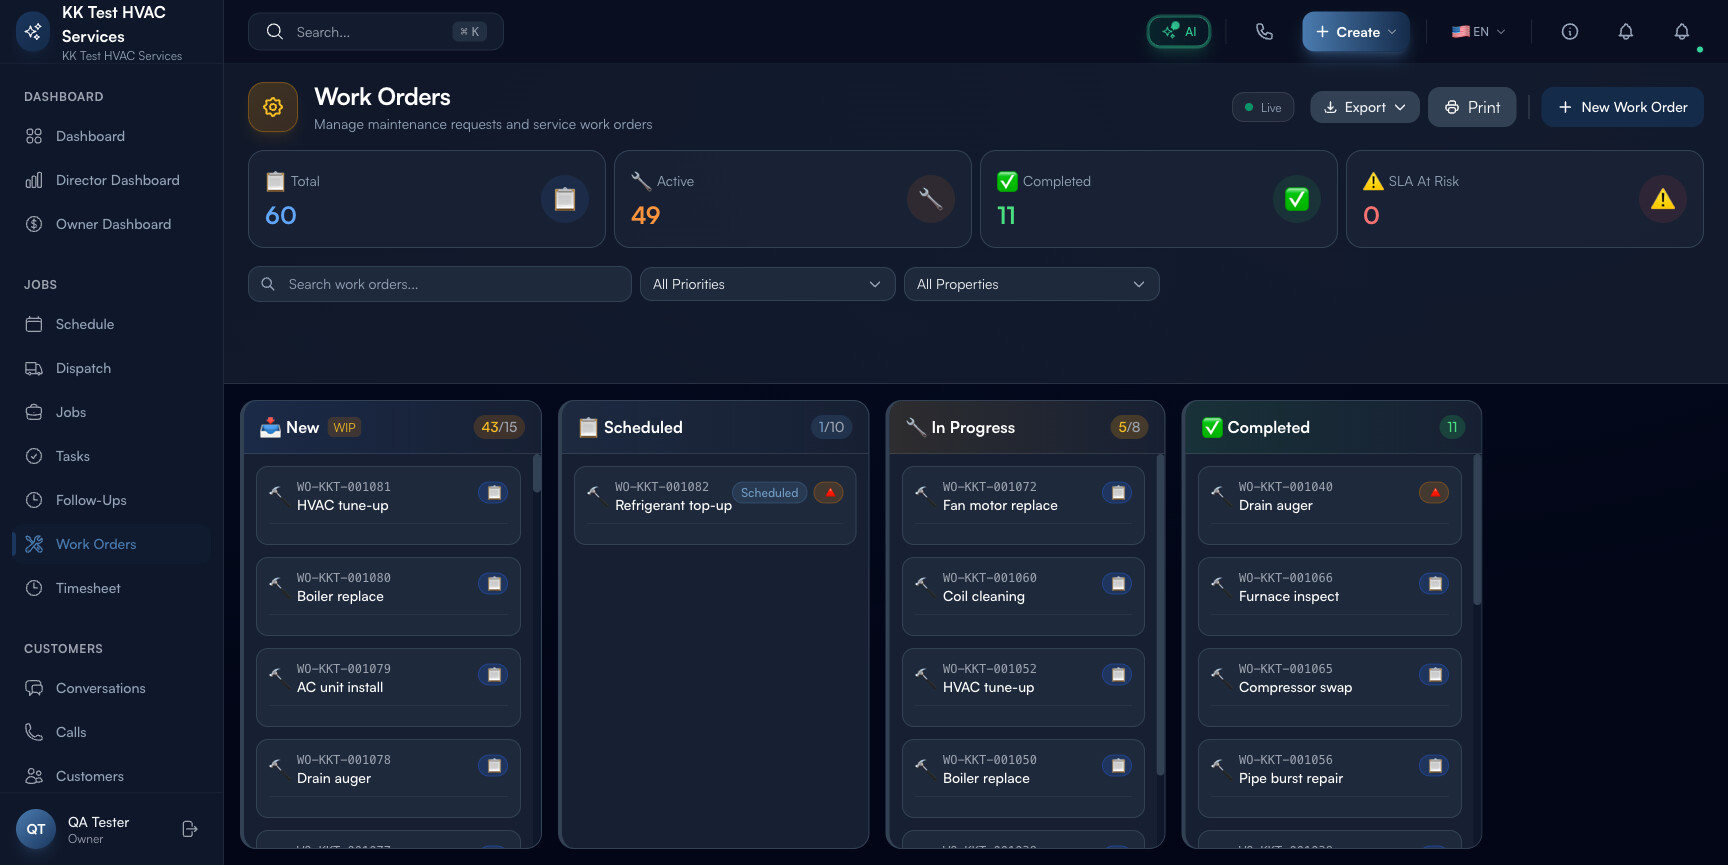
Step 2: Read the page header
The header strip shows the operational state:
![]()
- Title Work Orders + subtitle “Manage maintenance requests and service work orders”
- ● Live indicator — green dot when the board is receiving real-time updates from other dispatchers; red if you’re working off a stale snapshot
- Export dropdown — CSV / PDF
- Print — print-friendly layout for clipboard handoffs
- + New Work Order button — opens the create wizard
Tip: The Live indicator is the single most important UI element on this page when multiple dispatchers are active. Always glance at it before making changes — if it’s red, refresh the page first to avoid stomping on a teammate’s edit.
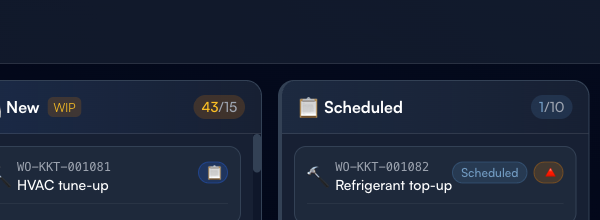
Step 3: Read the four columns
Cards flow left-to-right through four states:
![]()
 New — work orders created but not yet scheduled
 Scheduled — has a planned start date but work hasn’t begun
 In Progress — work is currently happening (visits booked or underway)
 Completed — all jobs under this work order are done
The number next to each column header is count / WIP cap (e.g. 43/15 means 43 in this column with a cap of 15). Going over the cap is a flag — too much work-in-flight, not enough finishing.
Tip: WIP caps prevent the bottleneck pattern most contractors fall into: 100 work orders in In Progress at any moment, none ever moving to Completed. Set caps based on your team’s actual throughput; respect them.
Step 4: Read a card
Each card in a column has the same anatomy:
- WO number —
WO-KKT-001081. Format: WO + tenant prefix + sequential number - Title — short description (“HVAC tune-up”, “Refrigerant top-up”)
- Status badge — Scheduled, In Progress, etc.
- Priority flag (▲ red) — visible only on Critical/High priority orders
Click any card to open the work order detail with the full job list, customer info, and notes.
Step 5: Filter by priority and property
Above the columns:
- Search work orders — matches WO number or title (full-text)
- All Priorities dropdown — narrow to Critical / High / Normal / Low
- All Properties dropdown — narrow to one property (essential for multi-property contracts)
Use combinations to slice. “Critical priority + Acme Property Management” shows just the burning issues for that one client.
Step 6: Click + New Work Order
Click + New Work Order in the top-right. The create wizard asks:
- Title — short description
- Customer — search-pick (or create new)
- Property (optional but recommended) — link to a specific property if it’s a multi-property customer
- Priority — Critical / High / Normal / Low
- Due date — when the entire work order should be completed by
- Description — full scope of work
- Initial line items — services and materials (you can add more later)
Save. The work order lands in the New column. Once you schedule the first visit, it’ll move to Scheduled automatically.
Step 7: Drag cards across columns
Drag any card from one column to the next to update its state. The card’s underlying jobs get cascade-updated:
- New → Scheduled — prompts you to pick a date and tech
- Scheduled → In Progress — marks the first job as Started
- In Progress → Completed — only allowed when all underlying jobs are Completed; otherwise a confirm dialog
Drag is the dispatcher’s primary action on this page. Click is for inspection.
Step 8: Track SLA risk
Cards with an SLA At Risk flag (red triangle) are at risk of breaching the agreed turnaround time. The SLA model considers:
- Original due date
- Customer tier (Service Contract members get tighter SLAs)
- Priority level
Click the SLA At Risk counter in the page header to filter the board to just the at-risk cards. Address these first every morning.
Step 9: Common new-user questions
Q: Should I use Jobs or Work Orders for this customer?
A: If the customer needs one visit, use a Job. If they need multiple visits over time on the same scope, use a Work Order with Jobs underneath. “Replace HVAC system” is a Work Order (estimate + install + follow-up); “Drain auger” is a Job.
Q: I created a Work Order but it shows 0 jobs. Where do I add them?
A: Open the Work Order detail → click + Add Job. The new Job auto-links to this Work Order — no need to remember to do it manually.
Q: Can I convert a Job into a Work Order if it grew bigger than expected?
A: Yes. Open the Job → click ⋯ → Convert to Work Order. The original Job becomes the first sub-job under the new Work Order; you can add more from there.
Q: My WIP counts are red — what do I do?
A: Don’t add more work to that column until counts come down. Drag oldest cards forward (close out anything that’s actually done), or escalate the bottleneck to your team — typically In Progress gets bloated when techs are completing visits but the dispatcher isn’t marking the work order Completed promptly.
Q: Is the Work Orders board the same as Schedule?
A: No. Schedule (guide) shows individual Jobs on a calendar with time slots. Work Orders shows Work Orders (not Jobs) on a Kanban with state. Different surfaces, different mental models.
Step 10: Common new-user mistakes
- Using Work Orders for one-visit jobs — adds bureaucracy without benefit. If it’s one tech, one trip, one customer, just use a Job.
- Skipping the priority field — defaults to Normal. Without explicit priority, the SLA logic can’t flag urgency. Set Critical/High when it actually matters; leave Normal otherwise.
- Manually creating Jobs instead of Add Job from Work Order — orphans the Job from the parent. Always use the + Add Job action inside the Work Order detail to keep the link.
Real-World Example
You sign a quarterly maintenance contract with a 12-property property manager. Without Work Orders: 48 separate Jobs (4 visits × 12 properties), no easy way to see that “Building #7 is only at 1 visit out of 4 this year”. With Work Orders: 12 Work Orders (one per property), each with 4 Jobs underneath. The Kanban board shows you Building #7 sitting in In Progress with 1/4 jobs done — easy to spot the slipped property and reschedule.
What’s Next?
- Creating and Managing Jobs — for one-visit work, use Jobs instead
- Managing Properties — multi-property contracts live here
- Preventive Maintenance Schedules — auto-generate recurring work orders
- Dispatcher Daily Workflow — combine Jobs and Work Orders in one playbook
Need help? Post in the Tech Support category or contact support@exoserva.com.