Adding team members is one of the first scaling moments for any contractor. The first hire turns a one-truck operation into a real business; the wrong invite can give the wrong person dangerous power over your data. This guide walks through every field of the invite form, the role/approval-level decisions you’ll make per person, and how to handle invitations that don’t get accepted.
Estimated time: 6 minutes
Before You Begin
- Owner or Tenant Administrator role — only these two can invite users (Roles, Permissions, and Security)
- Roles configured — at minimum the system defaults are enough; for nuance, set up custom roles before inviting (Roles, Permissions, and Security guide above)
- Approval Levels (R-Levels) defined — the dollar ceiling each level can sign off, also covered in the Roles guide
- The new team member’s email address and a one-line statement of what they’ll do (drives role choice)
Step 1: Open Team Management
Press ⌘K to open Settings, then click Team Management under Organization. Direct URL: /settings/team. The page header shows headcount counters: Total / Active / Invited / Inactive / Suspended with live numbers.
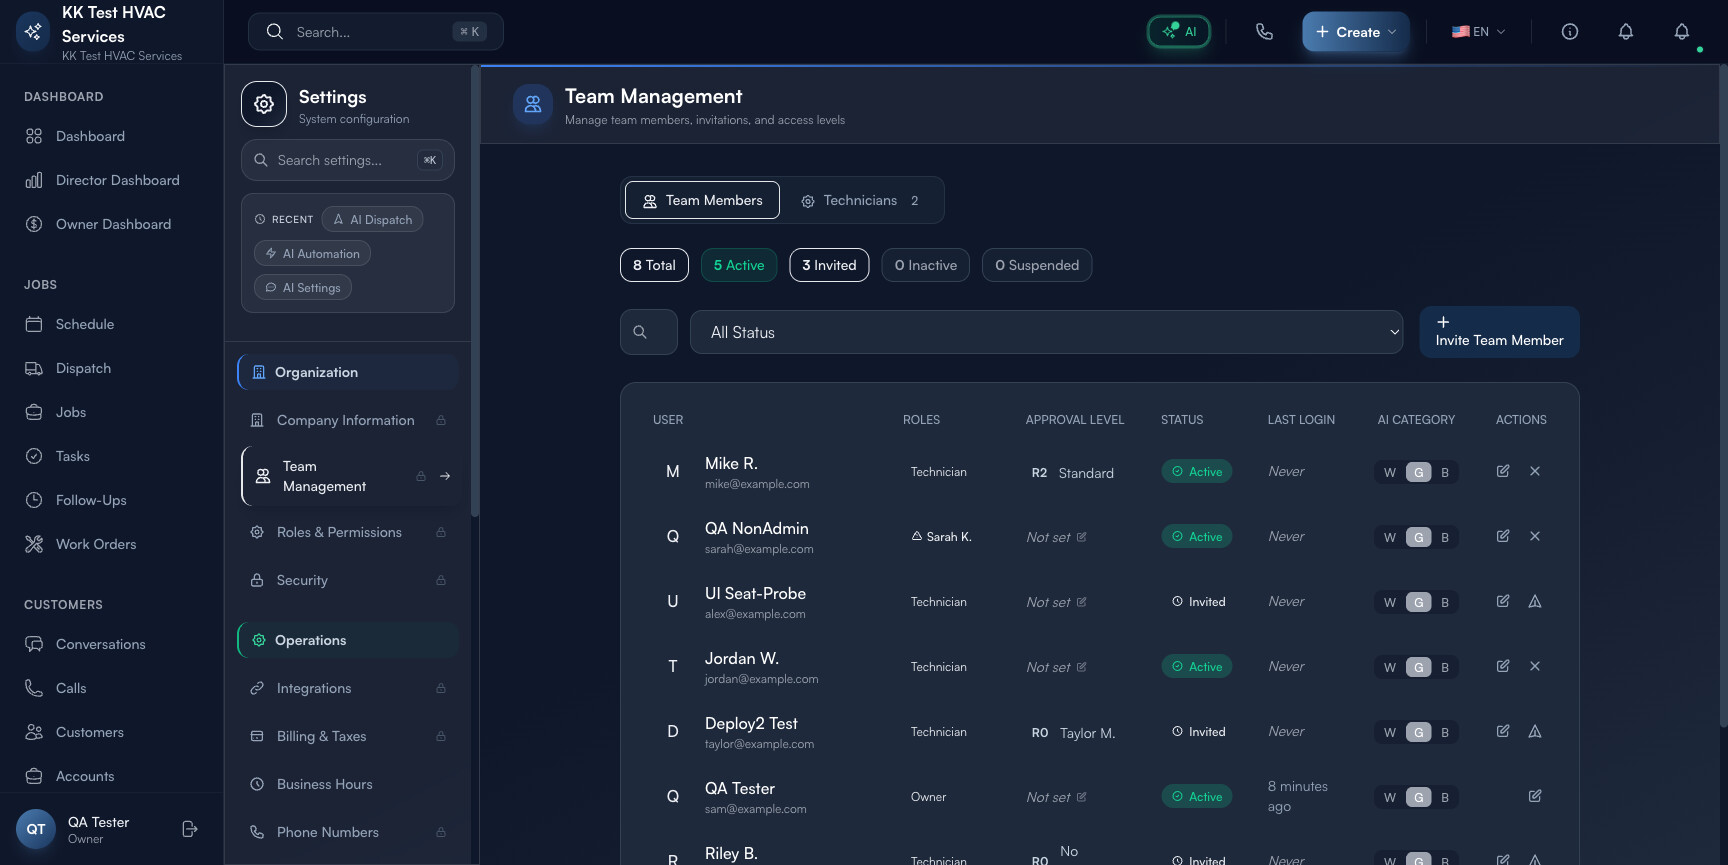
The two top tabs (Team Members / Technicians) split office staff from field crew — useful when your roster grows past ~10 people.
Step 2: Click “Invite Team Member”
Click + Invite Team Member in the top-right. A modal opens with the invite form.
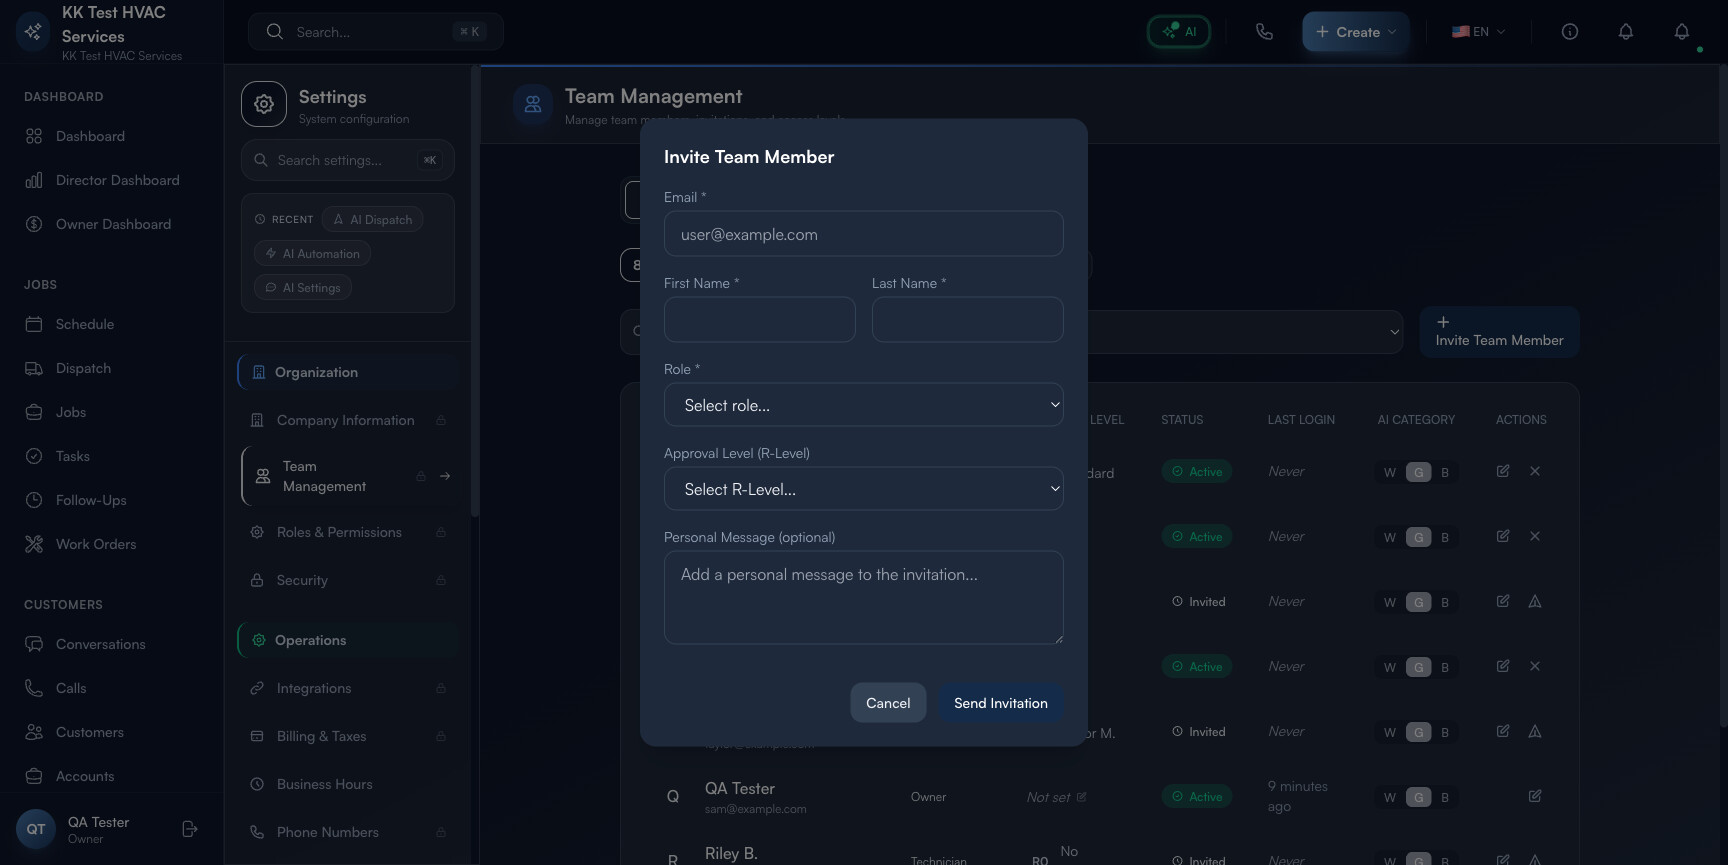
Six fields, two are required:
- Email (required) — where the invite link is sent; becomes the user’s login
- First Name (required)
- Last Name (required)
- Role (required) — drives feature access (see Step 3)
- Approval Level (R-Level) (optional) — drives the dollar ceiling of what they can sign off (see Step 4)
- Personal Message (optional) — appears at the top of the invite email; useful for context
Step 3: Pick the right Role
Click the Role dropdown. You’ll see your tenant’s full role list — system defaults plus any custom roles you’ve created.
The “good enough” mapping for typical field-service hires:
- Field Technician — every tech who works in the field
- Office Staff — dispatchers, customer service reps, schedulers
- Operations Manager — shop managers running the day-to-day
- Viewer — accountants, auditors, business partners who need to see but not change
- Tenant Administrator / Owner — only for true backups; never to “make life easier” for a regular role
Tip: When in doubt, pick the less powerful role. It’s much easier to upgrade someone who asks for more access than to claw back permissions after a costly mistake.
Step 4: Pick the Approval Level
Click the Approval Level (R-Level) dropdown. The R-Level governs the dollar ceiling of approvals separately from the role’s feature access:
- R0 No Approval — can’t approve any estimate / discount / refund
- R1 Basic — approves up to ~$500 (small jobs, minor discounts)
- R2 Standard — approves up to ~$2,000
- R3 Senior — approves up to ~$5,000
- R4 Lead — approves up to ~$10,000
- R5+ Manager / Supervisor — unlimited or near-unlimited
Match R-Level to the person’s actual judgment authority, not their job title. A senior tech with 15 years of experience might warrant R3 even though their role is Field Technician; a brand new hire with a Manager title might start at R1 until they prove out.
Warning: Never assign R5+ to someone you wouldn’t trust to write a $10,000 check on the company’s behalf. R-Levels are honored automatically by Exoserva — there’s no human safety net before a $9,500 estimate gets signed off.
Step 5: Add a Personal Message
The optional Personal Message field is your one chance to make the invite feel personal rather than templated. A good message:
- Names the recipient: “Hi Jordan,”
- Explains why they’re getting it: “…you’re being added to our team as a Field Technician. This is the platform we use for every job, customer record, and invoice.”
- Sets expectations: “…please complete setup within the next 24 hours so we can hand off Tuesday’s jobs to you.”
- Offers a single point of contact for help: “…questions? Text me directly.”
Skip it and the invite still works — but you’ll get more rapid first-logins with a personal note than without.
Step 6: Click Send Invitation
Click Send Invitation at the bottom-right of the modal. Behind the scenes:
- The recipient gets an email titled “You’ve been invited to join {Business Name}” with a setup link
- The link is single-use and expires in 7 days
- A row appears in the Team Management table with status Invited
- Counter at the top updates: Invited increments by 1
Tip: Send invites at the start of a business day, not Friday afternoon. People don’t set up new work tools at 5 PM Friday — the link sits unused over the weekend, and Monday morning you’ve got an awkward “did you get the email?” conversation.
Step 7: Track and re-send pending invitations
Filter the team table to Invited to see everyone with an outstanding invite. For each:
- Last Login column shows Never until they accept
- ⋯ menu offers Resend Invitation (refreshes the link, sends new email) and Cancel Invitation (revokes the link, removes the row)
Re-send invitations that haven’t been accepted within 48 hours; cancel invitations older than 7 days that the recipient won’t be using.
Step 8: First-login what to expect
When a new user clicks the invite link, they:
- Land on a Set Your Password page
- Pick a password (Exoserva enforces minimum complexity)
- Optionally enable 2FA at first login (recommended for Owner / Admin roles, optional for Field Technician)
- Land on the workspace dashboard, scoped to their assigned role’s feature set
Their account flips from Invited to Active the moment they set a password. The Last Login column updates with the actual time.
Step 9: When to Suspend or Deactivate
Two states for ending a team member’s access without deleting their history:
- Suspended — temporary lock-out (used for: disputes, investigations, vacation paranoia for high-trust accounts). Reversible in one click.
- Inactive — permanent end-of-employment marker. Their historical jobs / invoices / messages still show their name; they just can’t log in anymore.
Warning: Don’t delete a former employee’s account — Exoserva relies on user references for audit trails. Mark them Inactive instead. Deletion would orphan every job, invoice, and message they touched, breaking historical reports.
Real-World Example
You hire your first dispatcher, Jordan. They start Monday. Friday morning you open Team Management, click Invite, fill in: jordan@hotmail.com / Jordan / Wells / Office Staff role / R2 Standard ($2,000 approval limit) / personal message “Hi Jordan, welcome aboard. Set up your account today so we can train you on Monday’s first call.” Send. Jordan receives the email at 9:18 AM, sets a password by 11:30, attends a 2-hour training Saturday, and dispatches their first emergency call by Tuesday afternoon. Total invite-to-productive: 4 days.
What’s Next?
- Roles, Permissions, and Security — the full Roles + R-Levels framework
- Configuring Notifications — every team member sets their own
- Display Preferences & Theme — also per-user
- Owner/Manager Dashboard Guide — the data your team will produce
Need help? Post in the Tech Support category or contact support@exoserva.com.