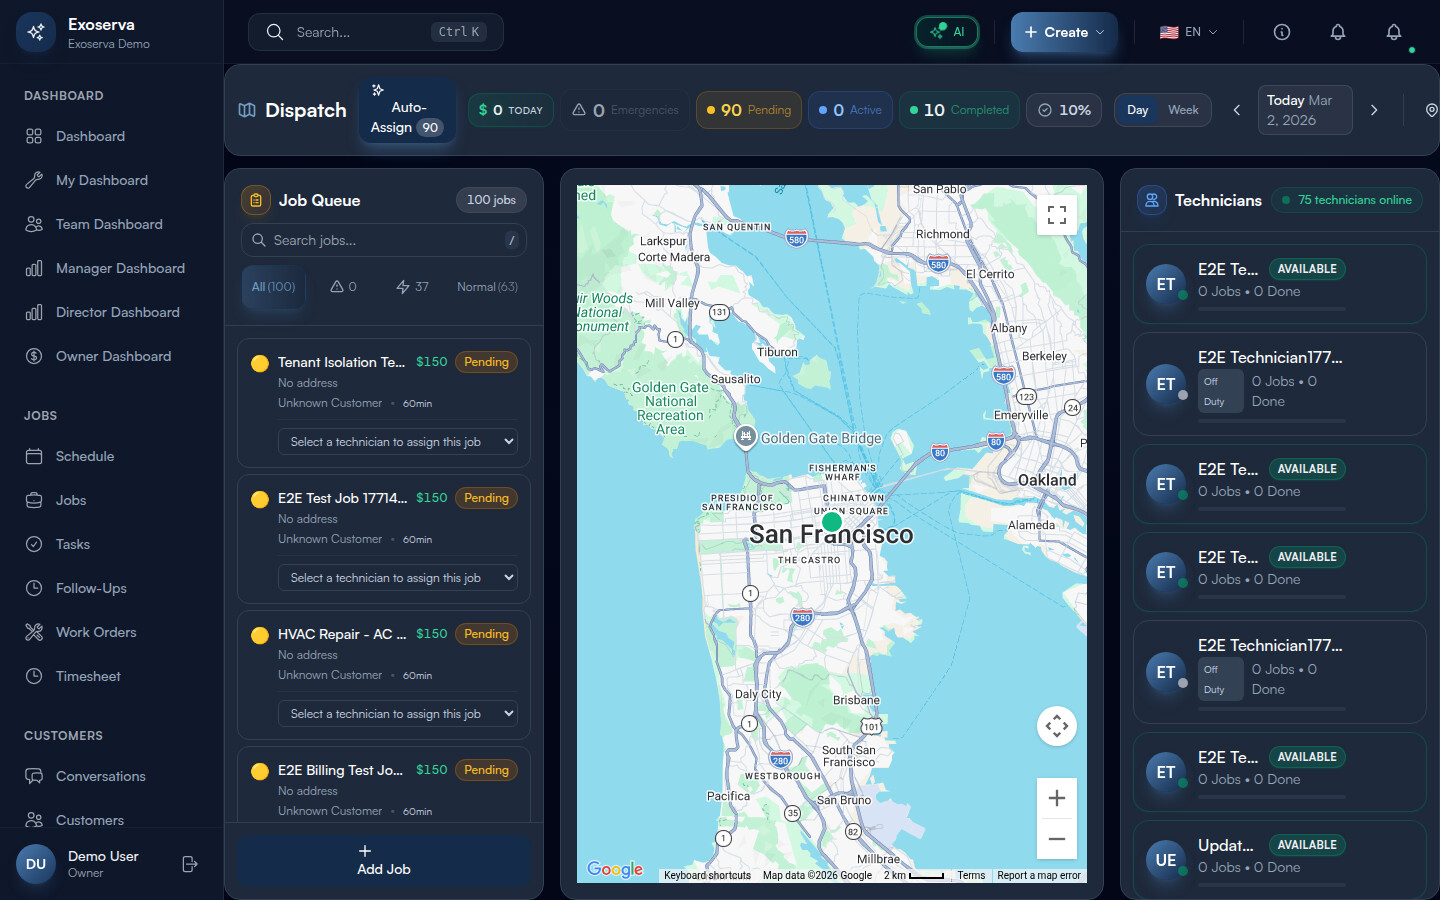
The Dispatch page gives you a real-time map view of your technicians and active jobs. See where everyone is, assign jobs based on proximity, and optimize routes to reduce travel time. This guide shows you how to use the GPS dispatch features to manage your field team efficiently.
Estimated time: 8 minutes
Before You Begin
- An active Exoserva account with Owner, Manager, or Dispatcher role
- At least one technician with location sharing enabled
- Google Maps integration active (configured during setup)
Step 1: Open the Dispatch Page
Click “Dispatch” in the sidebar under Operations. The page loads the Dispatch Center view, which features a full-screen Google Map on the right with colored markers for technicians and active job locations, and a “Job Queue” sidebar panel on the left listing all of today’s jobs with their status badges. At the top of the page you will see a compact header bar displaying the page title with a map icon, the “Auto-Assign” button with a sparkles icon, and real-time status pills showing counts for emergencies (red triangle icon), pending jobs (amber dot), active jobs (blue dot), and completed jobs (green dot). A “Day” / “Week” view toggle and date navigation arrows appear in the top-right corner, along with a green pulsing “Live” indicator confirming the map is syncing in real time.
Tip: Press Shift + ? at any time on the Dispatch page to open a keyboard shortcuts overlay. This modal lists all available hotkeys including A for AI Auto-Assign, R for Toggle Routes, / to focus the search bar, 1-4 for priority filters, and Esc to deselect.
Step 2: View Technician Locations
Each technician appears as a circular avatar marker on the map showing their initials inside a gradient-colored circle. A small status dot in the bottom-right corner of the avatar indicates their current state: a pulsing green dot means online and available, amber with an “On job” label means busy with a current assignment, and grey with an “Off duty” label means offline. The left sidebar lists every technician in a card format showing their name, job count (e.g. “3 jobs, 2 done”), and a colored workload capacity bar that fills green when under 50%, amber when between 50-80%, and red when above 80% capacity. Technicians with available capacity display a green “Available” badge next to their name.
Click any technician card to select them. When selected, the card expands to show a “Today’s Jobs” list with each assigned job’s priority icon, title, and scheduled time. The map zooms to center on the selected technician. Quick-action buttons appear on hover: a green phone icon to call and a blue message icon to text the technician directly.
Warning: Technicians whose status dot shows grey (“Off duty”) are not receiving location updates. Do not rely on their last-known map position for dispatch decisions, as it may be hours old.
Step 3: Assign a Job from the Dispatch Map
In the Job Queue sidebar, each job card displays the job title, customer name, address, scheduled time, a priority icon (red triangle for emergency, orange bolt for high, blue clipboard for normal), and a status badge (e.g. “Pending”, “In Progress”, “Completed”). An estimated revenue amount appears in green next to the title.
For jobs with a “Pending” status, an “Assign to…” dropdown appears at the bottom of the card. Click the dropdown to see a list of online technicians showing each technician’s name and current job count (e.g. “Mike Johnson (2 jobs)”). Select a technician to assign the job immediately. The job card updates its status badge, and the map draws a route line from the technician’s location to the job site.
Step 4: View Route Information
When you select a job card or click a job marker on the map, a route line is drawn from the assigned technician’s current GPS position to the job site address. The route overlay shows the estimated drive time and distance in a tooltip. You can toggle all route lines on or off by clicking the map pin icon button in the top-right toolbar area, or by pressing the R key on your keyboard.
When routes are enabled, a blue line traces the path between each technician and their assigned jobs, letting you visually assess travel distances across the entire team. This helps you make smarter assignment decisions and set realistic arrival time expectations for customers.
Step 5: Plan Multi-Stop Routes
Select multiple jobs for a single technician by holding Shift and clicking job markers on the map, then click “Optimize Route” in the toolbar. The system calculates the most efficient stop order based on travel distance, time windows, and job priority, placing emergency and high-priority jobs first.
A route summary panel appears showing the optimized stop sequence, estimated total drive time and mileage, and the time and distance savings compared to the original order. Review the estimated savings displayed in the route summary panel before clicking “Confirm” to apply the optimized route.
Step 6: Use Job Detail and Context Panel
Click any job card in the Job Queue sidebar to select it. The card highlights with a blue ring and the map centers on that job’s location marker. The job card itself displays key details at a glance: priority icon, title, customer name, address, scheduled time with a clock icon, and estimated duration in minutes.
For deeper context, click the job title to navigate to the full job detail page where you can view complete customer information, service requirements, job history, and attached notes or photos. The dispatch view gives you enough context for quick decisions without leaving the map, while the detail page link provides the full picture when needed.
Step 7: Filter the Dispatch View
Use the priority filter buttons at the top of the Job Queue sidebar to narrow the displayed jobs. Four filter buttons are available: “All” (shows total count), an emergency triangle icon (emergency only), a lightning bolt icon (high priority only), and a normal icon (normal priority only). Each button displays the count of matching jobs. The active filter is highlighted with a gradient background and colored border.
Use the search bar at the top of the Job Queue (or press / to focus it) to filter jobs by title, address, or customer name. The search combines with the priority filter, so you can search within a specific priority level. Press Esc or click the X icon to clear the search. Keyboard shortcuts for filters: 1 = All, 2 = Emergency, 3 = High, 4 = Normal.
What’s Next?
Now that you’ve completed this guide, check out:
Need help? Post in the Tech Support category or contact support@exoserva.com.